1.4K







Halloween Bat Trick or Treat Bag
I’m a fan of bats, and not just on Halloween, so it’s no surprise that I’ve done several projects featuring these little flying foxes.
A few bat facts:
Aside from being a favorite Halloween icon, bats are vital to the ecosystem.
They are the second largest order of mammals and the only ones that can fly.
If you’re not a fan of insects but you are a fan of pollination, then thank a bat.
And, if you want to keep up with the comings and goings of bats, check out Bat Conservation International’s live Bat Cam.
I like to incorporate bats into every area of my Halloween display, and I don’t think I’ll be tucking them into their coffin anytime soon.
They are a versatile element of the holiday, as they can be sweet or sinister and work into almost any theme.
We’re going sweet today with the latest in the Boo Bag collection – a bat.
So, let’s get started.
Before we begin, here are a few notes about the materials for this project.
To make a more sturdy trick-or-treat sack, we will use 2 mm craft felt, which is thicker than standard craft felt sheets.
If you’d like more durability, cut a piece of heavy cardstock or thin cardboard to line the inside bottom of your sack.
I list specific colors for the trick-or-treat sack, but feel free to experiment with your bat. Googly eyes and glow-in-the-dark accents are some fun options.
Lastly, this project can be machine or hand-stitched. Hand sewing may take a bit longer, but it may be easier than navigating a machine into tight spaces of bulky felt.
So, let’s get started.
For this project, we will need:
4 sheets of 9″ x 12″ 2mm purple craft felt
Scrap piece of black craft felt
Scrap piece of light purple craft felt
Scrap piece of white craft felt
16-17″ piece of belting trim
Scissors or cutting machine with fabric blade – I use the Cricut Maker
Adhesive – I like Beacon Felt Glue
Sewing machine and thread
Straight pins or clips (not shown)
We will also need the Bat Boo Bag template from the Haunted Library. Choose the PDF file to hand cut or the SVG file for machine cutting.
To begin, if machine cutting, upload the Bat Boo Bag template into your design software, such as Cricut Design Space.
For hand cutting, open the PDF template using your favorite PDF reader (Adobe, FoxIt, etc.).
Print your template, and ensure the pages are set to print at Actual Size. The base piece will exceed the print area, so select the Poster option under Page & Size Handling.
Cut two bat base pieces, two sides, and one bottom from the purple 2mm felt.
Next, cut two pupils and two teeth from the white craft felt.
Cut two wings from light purple craft felt.
Then, cut two eyes from black craft felt.
To assemble, glue or stitch the eye pieces together by placing the white pupils onto the black eyeballs and then gluing the stack on the white eye pieces.
Layout out the eyes and mouth onto the front base and glue them into place.
To assemble, stack the front onto the bottom piece and stitch together using a 1/4″ seam allowance. (The seam will be to the outside.)
Next, stack the back onto the bottom piece and stitch together.
Mark the center of the bottom and one side.
With the edges together, align the centers and pin.
When the centers are aligned, there will be 1/4″ of felt on each side that overhangs the bottom seams.
Stitch the side and bottom pieces together, beginning at the seam and leaving the 1/4″ overhang at both ends.
When the side is attached to the bottom, it should look like this:
Repeat for the opposite side.
Clip or pin the side piece to the front and stitch from the bottom to the top.
To attach the wings to the bat, tack the wings onto the front with a fabric glue stick and stitch into place.
Alternatively, hand stitch or use a permanent glue to attach.
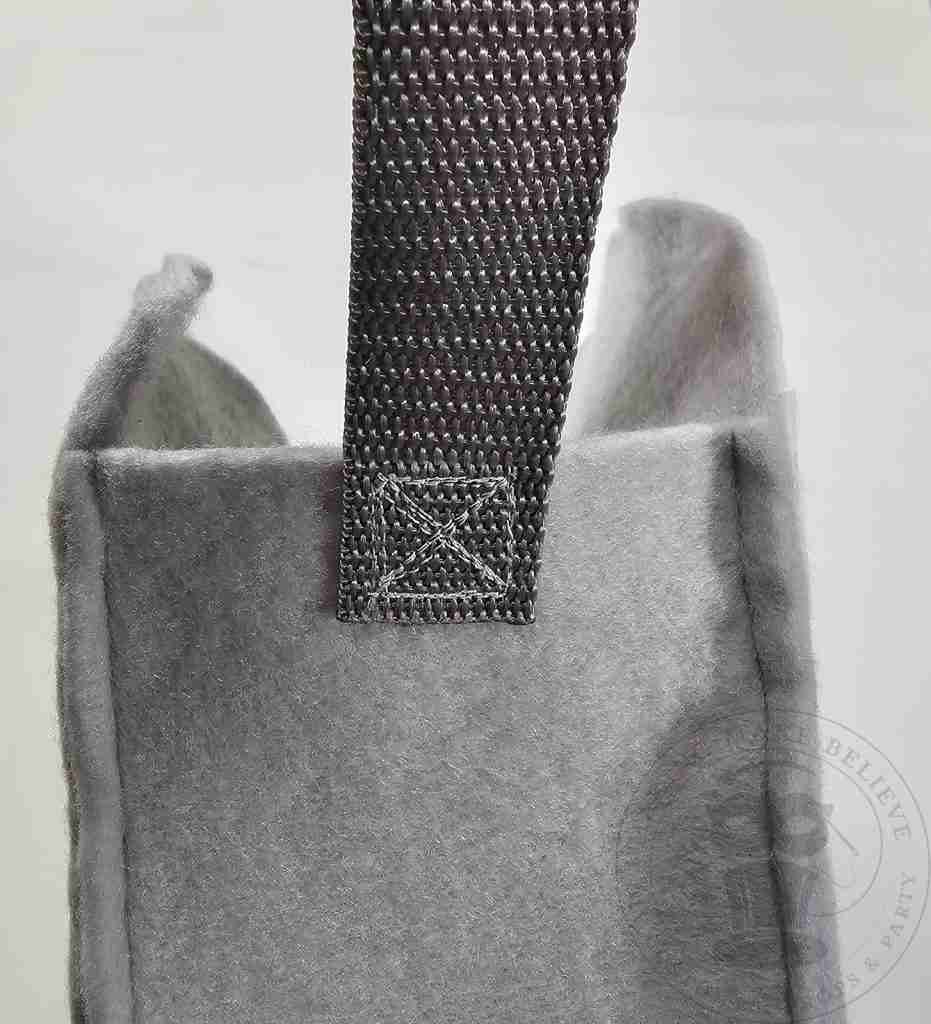
Prepare the handle by trimming the ends of the belting trim then carefully heating to prevent fraying.
Pin the belting to the center of each side of the bag.
Stitch down, across, up, and over to form a square, then reinforce the union by stitching an “X” in the center.
Repeat this two to three times to ensure the handle is well attached.
Demo shown on a grey felt to make it easier to see.
Until next time – stay spooky.

Check your email for the Haunted Library password.
Don’t miss a moment of the mischief.
Add hello@makingmakebelieve.com to your address book.
Join us and get access to our Haunted Library stocked with templates, printables, cut files, and exclusive content. Plus, you’ll receive Eerie Emails just for our subscribers.
*Stay as long as you like. Unsubscribe at any time.