Halloween is the time of year when shadows cast an eerie silhouette making the perfect backdrop for a good ghost story. The light dims, the leaves rustle, and we start to take notice of all the spooky sights and sounds of the season. And, if you’re like us, you like to add a little fright to your Halloween night.
There are many ways to add some ghostly fun to your haunted yard and displays. Some of my favorites are the digital decorations from Atmosfear FX. We have quite a collection, but as we decorate with the trick or treaters in mind, Jack O’Lantern Jamboree and Bone Chillers are at the top of the pile.
If you need a touch of scare here and there but aren’t quite ready for high tech, then this is for you. Today we’re going old’ school with some simple techniques for raising some spirits.
For these projects, I have a couple of public domain images that you can use. You can grab both PNG and PDF versions in the Haunted Library. I have edited them for these projects so you can dive right in.
So, let’s get started.
Ghostly Apparition Silhouette
For this first apparition we are using clear cutting mats to make a ghostly, semi-transparent silhouette.
To cut by hand, print the image PDF. Enlarge or reduce as desired.
Cut out your image from the paper and, using a pencil, trace it onto on the textured side of the plastic cutting mat.
Use sharp scissors or an X-Acto knife to cut out the image.
Machine Cut
If you are using a cutting machine, you will need the PNG format. (If you are unfamiliar with the difference between Cut Image and Print Then Cut Image within Cricut Design Space, a quick PDF tutorial is also available with this project and can be found in the Haunted Library.)
Place the Dollar Tree cutting mat, textured side down, onto your Cricut mat.
For Cricut Cutting Mat: Strong Grip Blade: Deep Point Blade Material Settings: Pressure 350 Passes 9x Deep-Point Blade
Before cutting, set the Pressure to More instead of Default.
Load the machine and being cutting.
Once cutting is complete, check to make sure that your cut has gone all the way through your plastic cutting mat material. If it has not, do not unload; instead, press the Cricut cut button on your machine, and it will cut again.
Display
To display your ghostly image in the yard, attach a wire or dowel to the base or use tape to attach to a window or door discretely.
I like to use these reaching up from the ground beside a tombstone.
Once your apparition is in place, highlight it with a colored led light, experimenting to get the shadows and overall look you want.
Large Ghost Hand in daylight
Large Ghost Hand in potted plant makes even the 4th of July look creepy
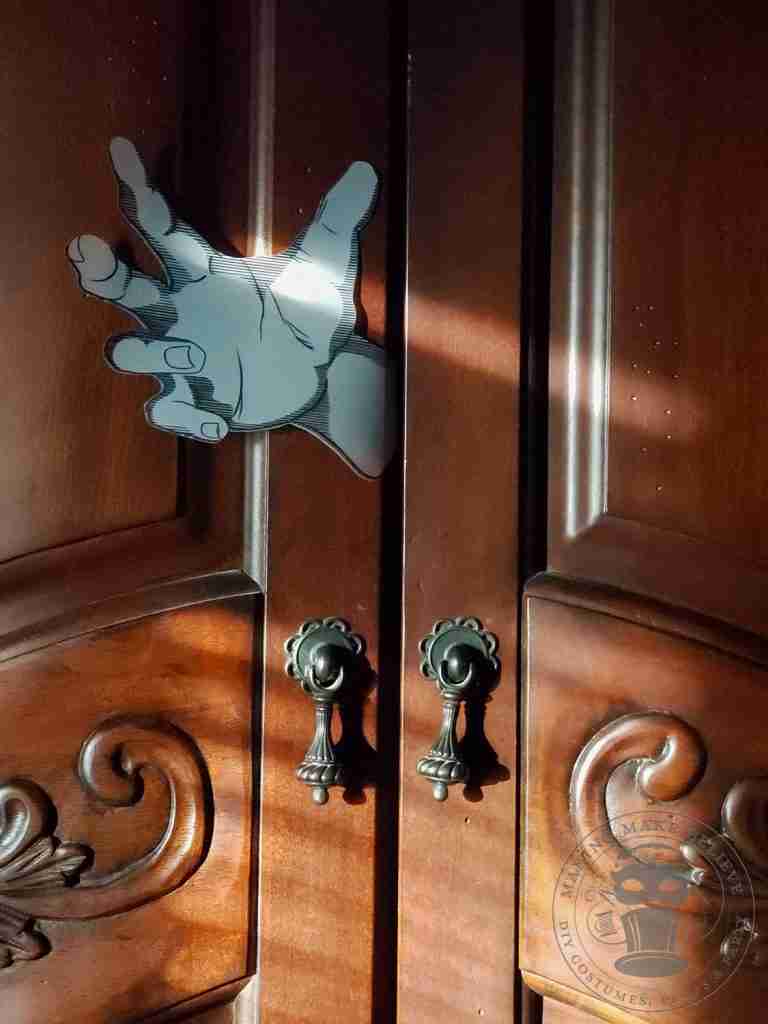
Ghostly Apparition Image
For our second apparition, we get a ghostly appearance thanks to translucent paper.
We will need printable vellum, an image of your choosing, a printer, and a cutting machine or scissors.
Hand Cut
To cut by hand, print the image PDF onto printable vellum.
When complete, remove it from the printer, careful not to smear the ink.
Use sharp scissors or an X-Acto knife to cut out the image.
Machine Cut
If you are using a cutting machine, you will need the PNG format. (If you are unfamiliar with the difference between Cut Image and Print Then Cut Image within Cricut Design Space, a quick PDF tutorial is also available with this project and can be found in the Haunted Library.)
Upload your image into Cricut Design Space, and load your vellum into your printer.
The Print Then Cut feature prints the image with a black box around it. These are registration marks, and they tell the Cricut where to cut. Cricut recommends using only white paper for their Print Then Cut feature, but we have a way around that!
Using the Print Then Cut operation, select Make It and then Send To Printer.
When complete, remove the vellum print from the printer, careful not to smear the ink, and set it aside.
Now, staying on the same screen, click Send To Printer again, this time printing on regular copy paper.
Cut the image away from the inside of the copy paper print, leaving only the registration marks.
Lay the copy paper over the vellum print and carefully line up the registration marks. Hold up to a window or use a light box if needed. Tape the white paper to the vellum using care not to tape over the registration marks.
Ok, now that we have the copy paper with the registration marks taped in place on the vellum print, we are ready to cut.
For Cricut Cutting Mat: Standard Grip Blade: Fine Point Blade Material Settings: Vellum Default Pressure
Display
I like to use these apparitions inside, reaching out from books, mirrors, picture frames, and doorways. I secure them using removable tape, thin wire and fishing line.
Once your apparition is in place, highlight it with a colored led light, experimenting to get the shadows and overall look you want.
Ghostly Hand Apparition in daylight with blue lighting
Ghostly Hand Apparition at night with blue lighting
These are so much fun and so simple! And, you can use virtually any image you want.
I love adding these ethereal elements into my decor, but what do you think? Does this inspire you to go low-tech in your haunted house? Let me know on Instagram or Facebook.
Join us and get access to our Haunted Library stocked with templates, printables, cut files, and exclusive content. Plus, you’ll receive Eerie Emails just for our subscribers.
*Stay as long as you like. Unsubscribe at any time.