3.5K


DIY Ghost Decorations
Do you see what I see? Is Halloween decor creeping onto the shelves earlier and earlier each year? Last year my first sightings were in mid-May, and this year my local Hobby Lobby filled the aisles with Autumn accents even earlier.
Even though I love the season, I’m always a little taken aback when I see the orange and black before we’ve even welcomed summer. I’m already starting to feel behind, though not even a single leaf has fallen.
So, since it appears that Halloween is coming on strong, we better get this party started and set our haunted plans in motion.
Last Halloween was my second year helping a photographer friend decorate her studio for Pic or Treat. If you’re local, this is a fantastic opportunity to get a Halloween-staged photo of your little’s in costume while trick-or-treating our historic and revitalized downtown.
The 2022 theme was ghosts, so to keep everything budget-friendly, I went old-school to craft some spooky spirits.
Today I’m sharing two spooky cute ghost decorations, each constructed of easy-to-find materials and quick to make – the perfect recipe for a kid’s Halloween party, Trunk-or-Treat, or last-minute decor.
The clock is ticking, so let’s get started.
We will need:
White craft foam 12″ x 18″
Black craft foam
Glitter craft foam
Adhesive – I use low temp hot glue, but double-stick tape will work in a pinch
Monofilament for hanging (optional)
*These ghosts and their accessories can also be crafted from cardstock or heavy paper
For machine cutting:
SVG cut file template (see below)
Cutting machine, I use the Cricut Maker
24″ cutting mat for machine cutting, Standard or Strong Grip
Deep Point or Knife Blade for craft foam
Fine Point Blade for glitter craft foam
To cut by hand:
PDF cut file template (see below)
Printer
Copy paper
Tape
Scissors or Finger Blade
Pencil or marker
The free cut files are located in the Haunted Library. Select the SVG for machine-cutting or the PDF to cut by hand. The files include three styles of ghost decorations plus a top hat, hair bow, bow tie, and witch hat to craft a custom look.
To Machine cut, upload the desired files into your software program. For example, I use Design Space for Cricut cutting machines.
You can customize each ghost to whatever size you desire. For reference, these are the dimensions I used to craft my DIY ghosts:
Before loading your mat into the machine, move the star wheels to the right side so they do not mar your foam.
Select the Craft Foam setting on your cutting machine and cut your ghosts from the white craft foam.
To cut by hand, print the template onto copy paper, cut out the ghost, and tape the pieces together to make your pattern.
Place your pattern onto your craft foam and trace.
You can use a pen or marker. I use a plastic letter opener to trace the pattern, which leaves an indent of the pattern in the foam.
Using scissors or a finger blade, cut out the ghost.
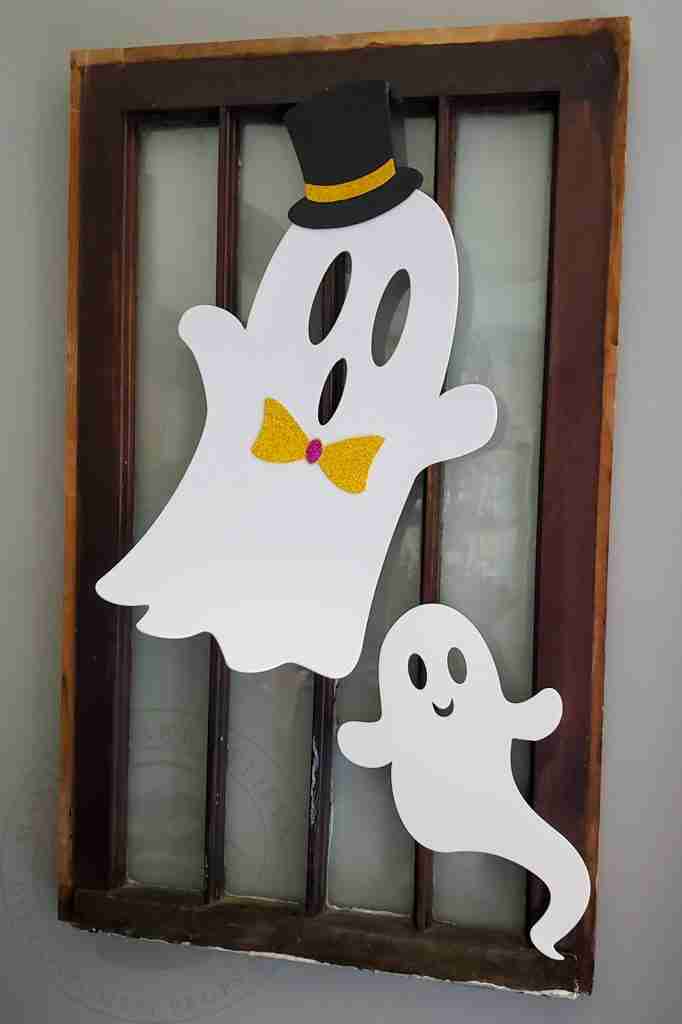
To dress your ghosts, cut hats and bows from black and glitter craft foam and glue them into place.
I like to add accessories to both sides of the ghosts so that when they are floating from the ceiling, they look good from every angle. This method also allows me to hide the monofilament by gluing it between the front and back hat or hair bow.
All dressed up and ready to party.
When you need a big impact without big dollars, these Spiral Specters are the perfect spooky solution.
We will need:
Printer
Copy paper
Tape
Scissors or X-Acto knife
Pencil or marker
22″x 28″ white posterboard
Black paper (cardstock, scrapbook, or construction paper)
Monofilament
We will also need the free PDF cut file from the Haunted Library.
Download and open the PDF file.
To print, ensure the template is set to print at the Actual Size and in Poster layout.
The default size (approximately 27.936″ x 21.633″) fits on a 22″x28″ poster board, but smaller ghosts can be made by sizing down the template.
Once the template is printed, tape the pieces together to make your pattern.
Cut around the outer edge of the spiral only, leaving the interior intact.
Secure the pattern to your posterboard using tape. I like to use Scotch brand Wall Tape as it’s easy to reposition.
If using an X-Acto knife, place a large cutting mat or cardboard sheet to protect your work surface from cuts.
Beginning at the center, cut through the template and the poster board.
Follow the pattern to complete the spiral.
Next, cut a facial expression from black paper for each side of your ghost. The cut file contains four different looks to customize your specters.
Tape or glue the face onto your ghost, attach monofilament to the top, and hang.
And just like that, you’ve got some spooky cute ghosties to haunt your event.
Which one will you make first?
Until next time, keep haunting!
Join us and get access to our Haunted Library stocked with templates, printables, cut files, and exclusive content. Plus, you’ll receive Eerie Emails just for our subscribers.
*Stay as long as you like. Unsubscribe at any time.