

Vintage paper pieces are one of my favorite Halloween collectibles.
Die cuts, postcards, artwork, partyware, treat bags, lanterns, and tally cards decked out in black and orange graphics are too hard to pass up.
Our office features a gallery wall that’s been a work in progress for over a decade. As new pieces are acquired and framed, they find their way onto the wall overlooking our desk below.


I find these surroundings amusing and inspiring, and they often light my creative spark.
For example, a vintage die-cut Jack O’Lantern and an articulated postcard inspired today’s project – a twisted Jack that sports a menacing grin and rotates at the stem to reveal a hidden Halloween message.
The Twisted Jack is the perfect creepy card for your favorite fright night fanatic.
Whether you love creepy paper crafts or just looking for a unique handmade greeting with a spooky edge, this project is equal parts eerie and fun.
If this sounds like a creepy good time to you – let’s cut into it.

For this project, we will need:
Cardstock in orange, black, and yellow
Cutting machine such as the Cricut Maker
Color Printer (not shown)
Adhesive – I’m using Bearly Art Precision Craft Glue
Awl
Fastener such as brads or hitch

We will also need the Twisted Jack cut file available in the Making Make Believe Shop.
The file includes all five layers you need to construct your Twisted Jack – four cut layers and one Print Then Cut layer.
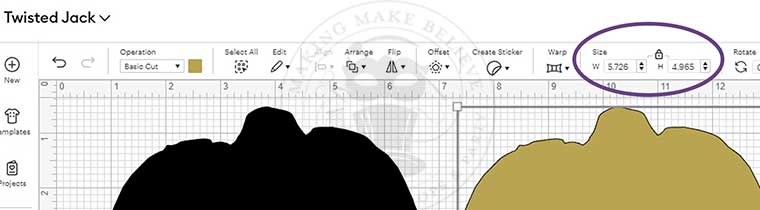
Upload the Twisted Jack cut file to your favorite design software, such as Cricut Design Space.
Your articulated Halloween card consists of five layers.
Resize each cut layer piece (layers 1, 3, 4, and 5) to 5.726″ x 4.965″ if necessary.
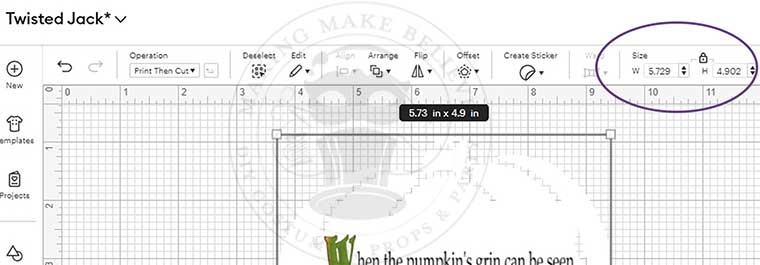
Resize the Print Then Cut layer (layer 2 with the text) to 5.729″ x 4.902″ if necessary.
Cut layers one and four from the black cardstock, layer three from the yellow cardstock, and layer one from the orange.

Also, Print Then Cut layer two with the text from orange cardstock.

Line up layer two (text pumpkin) and glue it onto the solid black pumpkin. Don’t forget to add the stem.
Set this stack aside.

Next, stack the black pumpkin with cutouts onto the yellow pumpkin and glue them together.

Finally, glue the orange face pumpkin onto the black and yellow stack and add the remaining stem.

Align the face stack on top of the text pumpkin stack and, use an awl to make a hole through all layers.
I recommend the awl over a hole punch due to the number of layers and the Dritz Awl with cap is my favorite.

To complete your articulated Halloween card, slip a fastener in the hole and secure.
I love using a hitch fastener for this project, but a flat brad fastener is recommended if mailing your card.

Now, your Twisted Jack is ready to reveal his hidden message.


Now, that was a twisted good time!
Find this pattern and other frightfully fun projects in the Making Make Believe Shop.
Until next time – stay spooky.