2.9K
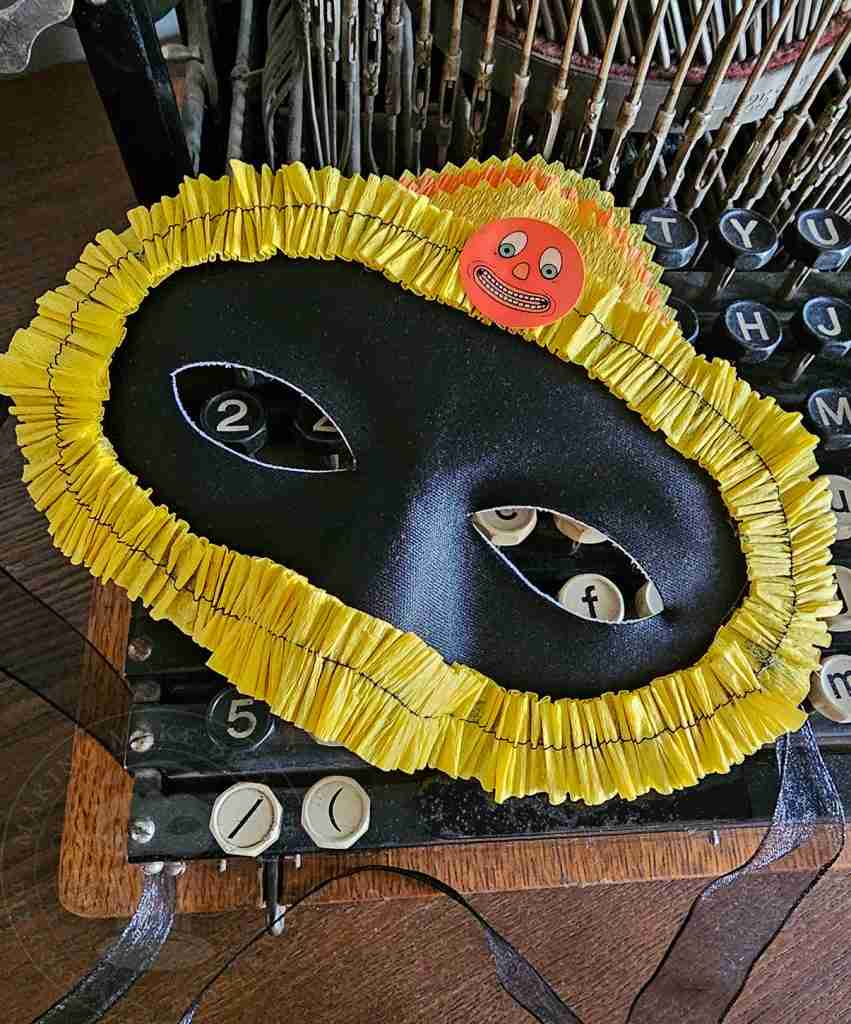




Vintage Style Halloween Eye Mask
It’s no secret that I’m a fan of the traditional Halloween colors. Orange and black are my go-to’s, and they are my first thoughts when I think of decorations for the season.
I enjoy all of the colors associated with Halloween, from the old-style harvest yellows and moss tones to the classic modern purples and greens and even the current trend of pastels. But – my favorite remains, the tried and true – the traditional orange and black.
Years ago, we hosted a Witch’s Ball and draped the scene with oodles of crepe paper in these traditional colors. Of all our annual parties, this one remains my favorite.
Today, I want to revisit the traditional style by creating a piece that oozes an early 1900s charm but is easy on the budget and simple to make.
I decided to break out my crepe paper rolls again and fancy up some simple domino masks I could use as party favors.
And this project gets even better as you can use these as costume pieces or party decorations.
So, let’s get started.
For this project, we will need:
Black satin domino eye masks
Assorted crepe paper rolls
Scissors
Sewing machine or needle and thread
Pinking shears or other decorative scissors
Hot glue
Ribbon (optional)
To begin, cut a 3′ length of crepe paper ribbon from the roll and then cut it in half down the center to create two 3′ lengths.
Next, to set up your sewing machine, select a straight stitch and set it to the longest length. For my machine, the longest stitch is 5.
Then, set the tension to the strongest position. On my machine, this is 9.
Align the sewing machine needle to stitch down the center of the piece, backstitch to secure, and begin sewing.
I like to add a bit of resistance by keeping the crepe paper taut, which helps the paper to ruffle. The trick is not to pull too tightly to avoid tearing the crepe or damaging your needle.
Ruffle as tightly or loosely as you like.
When you reach the end of your piece, backstitch and cut your threads.
If you prefer to use a needle and thread instead of sewing machine – that works too!
Next, use the pinking shears to cut three half circles from the crepe paper roll. I cut mine approximately 3″ wide at the base.
Stack the circle pieces together and glue them together at their base.
Center the stacked half circles along the front upper edge of the mask and glue them into place.
Before decorating the mask, decide whether to keep the elastic band.
If replacing, now is the time to remove the elastic and attach the ribbon.
Starting at one side where the elastic band or ribbon is attached, glue the ruffled festoon around the outside edge of the mask.
Continue adding festoon until it surrounds the entire mask, then cut it slightly longer than needed, turn it under, and glue it into place.
Level up your Halloween eye mask with our Vintage Style Halloween Icon Printables (a Subscriber Exclusive), which you can find in the Haunted Library.
These vintage style Halloween eye masks are so much fun! I am trying to decide whether to offer them to guests or hoard them all as Halloween decor.
I think I’ll go make some more.
Until next time, stay spooky.

Check your email for the Haunted Library password.
Don’t miss a moment of the mischief.
Add hello@makingmakebelieve.com to your address book.
Join us and get access to our Haunted Library stocked with templates, printables, cut files, and exclusive content. Plus, you’ll receive Eerie Emails just for our subscribers.
*Stay as long as you like. Unsubscribe at any time.